Once your site survey is complete and your proofing and exclusion work carried out, as per steps 1 to 3 in our PelGar 6 Step Rodent Control Plan, you may still find that you need to implement a baiting regime to bring the population under control. Remember that without the necessary proofing and exclusion work all you are doing is removing one population and inviting the next into the ready-made, empty home; so it’s critical that you carry out these works first or in tandem with the baiting plan to achieve sustainable control.
Once you start planning a baiting regime it’s important to understand the different types of rodenticide bait, how they work and where they should be placed to get the maximum effectiveness. Failure to bring a population under control is far more likely to be down to a poor baiting strategy than resistance or poor quality bait.
So, following on from our first 3 steps:
Step 4 – Selecting the correct bait
There is no such thing as a universal rodenticide that you can use effectively in every situation. While the active ingredients used in the industry may be common, the target pests and the environments in which they live are very different. Providing effective control therefore means that the active ingredients need to be available in a wide range of high quality formulations to meet these challenges.
When selecting the most effective bait for each situation you therefore have two important considerations: the active ingredient and the formulation.
Active ingredients
Rodenticide baits fall in to two categories – poisons (zinc phosphide, bromethalin, cholecalciferol and strychnine) and 2nd generation anticoagulants (difenacoum, difethialone, flocoumafen, bromadiolone and brodifacoum).
Poisons work within minutes of being eaten but do NOT have an antidote and so extreme caution should be used in domestic, residential and other situations where non-targets are prevalent. The rapid action can also cause problems if the rodent dies near the bait station or not enough bait is eaten and the rodent is ill; as the other rodents will simply avoid the bait to avoid the same outcome which results in bait shyness.
Anticoagulants can be antidoted with Vitamin K1, which they work to supress so that the rodents’ blood is no longer able to clot, leading to fatal internal haemorrhaging. Even when a lethal dose is eaten in one meal the effect is not apparent immediately, and so the remaining population do not associate the anticoagulant bait with the consequences. This lag period also enables more effective administration of the antidote should it be required for the treatment of a non-target animal.
The toxicity of these active ingredients to rodents is measured using an LD50 calculation. This measures the amount of bait required to administer a lethal dose to 50% of a test population to give a comparative toxicity level. This allows the toxicity of different active substances to be compared.
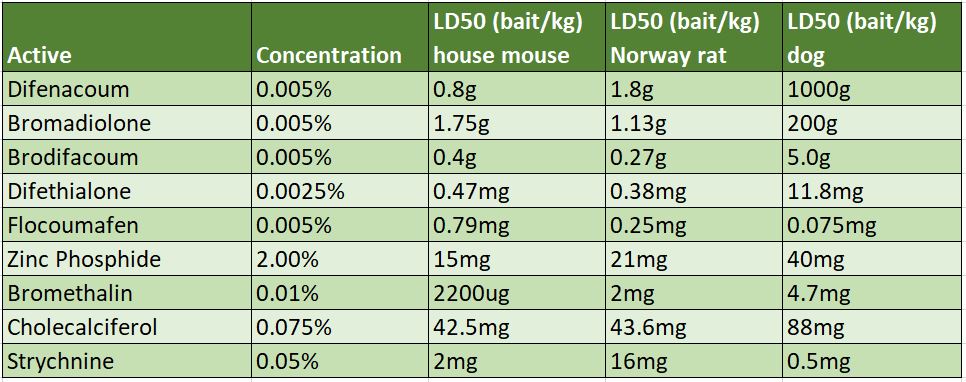
A typical house mouse weighs 25g and typical Norway rat weighs 280g, consuming a daily amount of 3g and 25g respectively. Actives are considered highly toxic when the LD50 is low (ie only a small amount is required to be lethal) and less toxic when the LD50 is high. So how does this apply to your bait selection?
The lethal dose for a high LD50 / low toxicity anticoagulant bait (eg difenacoum) is 9g for a rat and 0.4g for a mouse. Both rats and mice will consume this quantity in a few meals - potentially within 1 day but more likely across a couple of days. Critically actives at this end of the scale have a much lower risk of endangering non-target species such as dogs which would need to consume a great deal of bait to ingest a lethal dose, so if they are prevalent these actives are the best option.
The lethal dose for a low LD50 /high toxicity anticoagulant bait (eg brodifacoum) is 1.3g for rats and 0.2g for mice. Both rats and mice will consume this quantity in one meal. As a result they can potentially ingest several lethal meals before they die. It is important to understand that a rodent will not die any faster because they have multiple times the lethal limit, but they can cause environmental contamination and consume bait which could be used to control other pests later so it is important to get the baiting levels right.
Formulations
In addition to understanding which active you are using you also need to consider WHERE you are using it, and this is why the formulation type is an important part of your baiting strategy. Your aim is always to tempt rodents away from their natural food source to eat the bait instead, so it needs to be more attractive and more readily available or why would they bother? As we reminded ourselves earlier, rats are extremely neophobic and so a bait that is close to their existing food type is also more likely to be consumed. A further consideration is whether the bait security can be compromised by being removed, hoarded or spilled.
The main formulation types are:
- Pellets
With a long shelf life in dry conditions, pellets offer a complete diet and work well where rodents have been used to eating compound feedstuffs often used to feed farm animals. - Whole wheat
The most widely accepted bait formulation for all rodents, whole wheat is particularly useful on farms where whole grain cereals form the basis of their diet. - Cut wheat
Particularly effective against mice as they have a tendency to ‘kibble’ whole grain baits - stripping off the treated outer surface and only eating the inside. - Pasta / soft bait
A very attractive bait that will tempt rodents away from any other food sources. Its high energy content makes it particularly useful in cold weather and during the breeding season. - Wax blocks
Ideal for baiting in damp or humid conditions or in places subject to occasional flooding. - Contact Gel
Especially effective where feed baits have been resisted or are not practical; rodents ingest a lethal dose of the sticky gel through normal grooming behaviour.
Whichever combination of active ingredient and formulation you choose to best suit the pest and the environment you are dealing with, it is worth remembering that bait quality is also determined by the added ingredients manufacturers use to make each formulation attractive and palatable to rodents. Whilst higher quality baits may be more expensive because they contain higher grade ingredients, they are also by that very fact more likely to be effective because they are more palatable.
Finally, you must always check the label for the authorisations granted for use, as they do vary. You must comply with these conditions of use and follow the directions and any other information contained in the label as failure to do so may result in punitive action by the enforcement authorities.
Step 5 – Follow a sound baiting regime
Once the bait has been selected the next step is to make sure you follow a baiting plan that delivers results. PelGar has developed the SUNSHINE method for successful rodent control:
- Securely place the bait in bait stations and mark on your site survey plan.
- Use the correct amount of bait in enough baiting points to cover the treatment area.
- Never under bait – it’s simply a false economy.
- Service bait points regularly – ideally every 2 to 3 days but at least once per week. The more
often you check, the quicker you will achieve control. - Hunt for dead rodents and remove for disposal.
- Inspect bait points – check they remain secure, replenish busy ones, remove any spoiled
bait and relocate any bait placements that are untouched. - Non targets? Make sure wildlife, farm animals, pets and children cannot reach the bait.
- End of treatment tidy – often overlooked but an essential part of your plan; store any unused
bait and associated equipment out of the reach of children and non-targets.
Placing bait stations
Following your earlier site survey place bait stations at points of ingress and along well used rodent routes. No rodent is going to go ‘out of its way’ to find your bait, so think like a rodent to maximise bait take! Bait stations can be placed under propped sheets of wood, metal sheets or slates to protect them from bad weather and make them less obvious but always remember to ensure they are inaccessible to non-targets including birds.
To overcome rats’ neophobia it is a good idea to camouflage the plastic smell of bait stations by rubbing them down with dirt, debris, leaves etc from the site. Try to ensure rodents cannot simply avoid the bait stations by going around them - use things on the site to your advantage to ‘direct traffic’ and block alternative routes (generally as part of your proofing and exclusion work).
Each bait station should be labelled correctly with your contact information and the bait contained within so that any issues can be swiftly dealt with. Mark the placement of bait stations on your site survey, make a note of bait consumption in each and, if necessary, where you moved any that needed relocation. Go through the bait placement with your customer so that they are aware of the placements and the risks, and the actions they should take in an emergency. You may wish to get their signature to confirm they have received and understood this information.
How much bait is enough?
One of the most common mistakes in a baiting strategy is under-baiting, either through not placing enough bait stations or by not using enough bait. Often the mistaken conclusion by PMP’s is that the rodents are resistant or bait shy and thus it is a problem site when, actually, it’s just a poor plan. So here are some simple guidelines to follow:
Low infestation - rodents only seen or heard at night and the site showing only small, but significant, damage by gnawing. Few droppings evident and only a few active burrows:
- High LD50 bait (eg difenacoum) use 200g every 10 meters (30 feet)
- Low LD50 bait (eg brodifacoum) use 60g every 10 meters (30 feet)
High infestation - rodents often seen in the daytime, conspicuous damage to property and goods by gnawing. Abundant droppings, runways evident and many active burrows:
- High LD50 bait (eg difenacoum) use 200g every 5 meters (15 feet)
- Low LD50 bait (eg brodifacoum) use 60g every 5 meters (15 feet)
It is best to tackle large populations by increasing the number of bait points, not the amount of bait within them. This will help get bait to more rodents faster and efficiently but it is not simply a case of over baiting to achieve quick results, as this will adversely impact non-targets and the environment... and be a wasted cost for you and the customer.
It is important to record the amount of bait put down so that you can follow the patterns of activity to assess what is going on at the site over a couple of weeks, so keep on top of your inspections to record and take action. Be aware that it can take some time to overcome the neophobia with rats. Keep baiting until all feeding activity has stopped.
If bait take is still low after a couple of weeks but recent activity is evident then it’s time to relocate the bait stations to an area of higher activity and check that your proofing work is driving rodents towards the bait.
If you find that bait take is substantial over a long period consider whether non-target animals (especially those smaller than the target pest) are consuming the bait or whether an immigrant population has moved in. Again, check through your proofing and exclusion work to resolve these issues. Only if neither of these are occurring can resistance be suspected.
Step 6 - Remain vigilant
A well planned rat control programme that uses enough of the right type of bait, in the right places, at the right time, should achieve a high level of control. But don’t give up once the resident population has been eliminated. There will always be new colonies waiting to take advantage of the site and so rodent control requires ongoing thought and attention.
This means follow-up treatments may be needed two to three weeks after the initial baiting.
Most immigrant rats will travel down recognised and identifiable routes such as hedges, drainage channels and property boundaries. You can anticipate their movements and cut off entry to the site as part of your proofing and exclusion work.
Permanent bait points are discouraged as they pose a risk to non-target species and their effectiveness simply decreases over time, unless you have a constant problem with re-invasion that cannot be dealt with through exclusion and proofing. However, temporary baiting points along the direction of travel will help deal with incomers before they gain a foothold – it is always easier to deal with a few opportunistic rodents than a whole population. Make sure the site is kept clean and tidy as per step 2 of the plan and pick up on any ongoing or new maintenance requirements.
Search for and remove any dead or dying rodents and dispose of them safely following the instructions on the product label. This is particularly important to reduce the risk of secondary poisoning to predatory non-targets.
At the end of a treatment ensure all traces of bait are removed from the site; collect up all spoiled and uneaten bait and dispose of it according to the instructions on the product label. If a previous PMP has left bait you should give them the opportunity to remove it, but if this cannot be arranged you have a duty of care to dispose of this rodenticide safely. It is good practice to make it clear to the customer at the start that this stage will be an important part of the treatment plan, but if you are denied access to do so make it clear that the responsibility for disposal has now been transferred to them in writing.
Unused baits should be safely stored in their original containers out of reach of children, wildlife, farm animals, pets and unauthorised personnel. It can be used in future baiting programmes according to the storage information and product expiry date on the label.
Conclusion
Following the first 3 steps on PelGar’s 6 step Rodent Control Plan you will have carried out your detailed site survey, tidied up and done all of the necessary proofing and exclusion work, but you may still need a baiting plan to eliminate the resident population. To carry this out effectively you need to select the correct quality bait, based on active ingredient and formulation, to best fit the situation you are facing and then ensure that well-baited bait stations are placed in properly thought out locations to achieve maximum bait take. The number of bait stations you place, the amount of bait in each and where you place them will have a direct impact on the outcome. Too little bait and your strategy is highly unlikely to yield results, too much and you risk affecting non-targets and the environment; let alone the cost of unused and spoiled bait. Poorly positioned bait stations, even heavily baited, will also fail to yield results. Once your baiting strategy has worked you need to remain vigilant with ongoing inspections and routine maintenance to ensure all of your proofing work is not undone and the next population does not take up residence.
Rodent control programmes often fail because:
- The wrong type of product is used, or it’s of a poor quality
- Not enough bait is used
- Baiting stops too soon
- Bait stations are put in the wrong place
- Proofing hasn’t been done, so more rodents move in
- Follow-up inspection is too late
Following the PelGar 6 Steps to Rodent Control plan gives you an integrated pest management strategy that is simple and methodical to implement and becomes a checklist to help you quickly identify solutions when problems are encountered.

